Apricot & Orange Blossom Pudding

This delicate dessert has all the looks of showstopper without the forty steps of a complicated recipe. I love custards and especially a french egg and vanilla bean creme pastry but this milk pudding is egg free and thicken with cornflour. Ive gone a little off the norm by using stevia to add sweetness and poached fruit.

20140717_155427~2

Lets start with I don’t know the exact origins of this pudding and at the risk of looking it up on Wikipedia it appears as a dessert loved by many different cultures. Lets face is desserts should have no boundaries. Flavoured with lemon in Italy, rose water in the Middle Eastern also called “Muhalbiyah”.

The Greek pudding called “Alevria” which can also be lactose free is often made with a reduction of grape juice to make a syrup or the milk version flavoured with mastic or orange blossom water. It is the Greek versions that I am most familiar with and most probably the first ever custard I ate as a child.

A variety of toppings common in to both the Middle east and the Mediterranean almost always include crushed walnuts or pistachios and spices like cinnamon.

Ive add poached fruit and its juices for freshness, like apricot halves but peaches are also perfect and if you preferred passionfruit or a raspberry coulis then go for it.

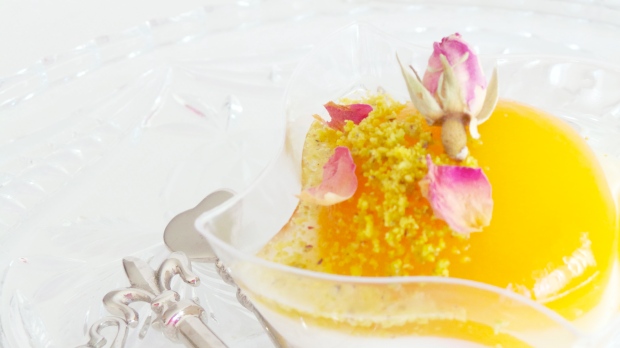
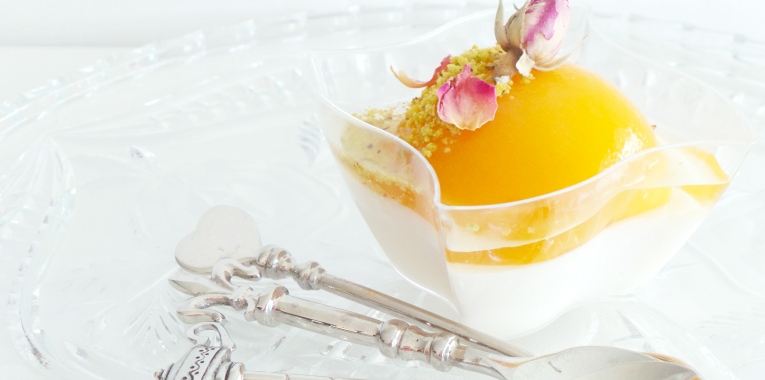
This pudding is flavoured with orange blossom water and a sprinkling of crushed pistachios and for added decadence Ive added a few dry edible rose petals.

20140717_155230

“Apricot & Orange Blossom Pudding”

4-5 serves

Ingredients

500ml Milk

40g Stevia

35g Cornflour

1 tablespoon Orange Blossom water

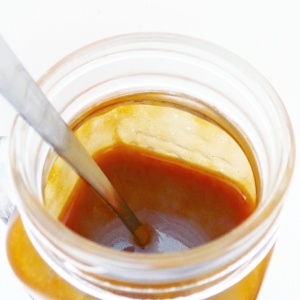
5-6 Poached Apricot halves reserve the juices

50g Pistachios – Crushed

Method

  1. In a medium saucepan add the stevia and the cornflour mix well.
  2. Add Milk and whisk together till no lumps of cornflour are visible.
  3. Continuously stir to stop it from sticking to the bottom of the pan. Mix while on medium heat till it thickens and large bubbles rise to the top and keep mixing for a further 1-2 minutes. Remove from heat and add the orange blossom water stir to combine.
  4. Pour the pudding into individual heat proof ramekins
  5. Allow to cool to room temperature then cool in the refrigerator
  6. Top with an apricot half, pour a little syrup over the top and sprinkle with crushed pistachios.

*For extra decadence Ive used edible dry tea rose for a little WOW! Factor 🙂 …………………..(I purchased the roses from T2 the tea shop)

*This recipe can be doubled if required

*Fresh edible flowers can be used (please be mindful to purchase these for consumption purposes as you do not want to be serving up flowers sprayed with pesticides)

20140717_155206~2

Gingerbread Angels

Christmas just isn’t the same if I don’t bake gingerbread Angels, Deer or Gingerbread Men!

…. well if Im honest there will always be something baking.

img_20151216_210506

I love this spicy biscuit especially when just baked. Who needs exotic air fresheners when all you need to do is a little baking. The warm aromas of Ginger, Cinnamon, Nutmeg and All Spice will have you reaching for the kettle and sitting down with your favourite brew in one hand and a Gingerbread Angel in the other.

I’ve been asked a few times and its worth noting that to build a gingerbread house the dough is a little different slightly dry and once baked not as soft and fluffy as the gingerbread men you might be familiar with. My recipe can be used for both individual biscuits like these angels or if you want to make a gingerbread house. After baked the biscuit is crisp but after a few days they begin to soften slightly.

To decorate the angels or other shapes I like to use Royal Icing and a few soft shell sugar pearls and sprinkles to add a little glam like the red and green and red garland wreath or the gold sugar crystal hearts its really up to you. In the past Ive also used 100’s and 1000’s and they look great too. I hate to admit this but its all up-to the Christmas Tree and the overall household decorations  that dictate that years colour theme…..That’s a bit over the top but then again thats me!

img_20151216_191902

You will need:

Rolling Pin

Baking trays

Baking Paper

Cookie Cutter (Angel, Reindeer, Santa) Ive used Angel

Ingredients:

100g Unsalted Butter

200g Soft Brown Sugar

150g Molasses

150g Golden Syrup

1 Egg

700g Plain Flour

1 teaspoon Baking Powder

1 teaspoon Ginger powder

1 Tablespoon Cinnamon Powder

1 Tablespoon Mixed Spice

1 teaspoon Bicarbonate of Soda

1 teaspoon White Vingar

A little extra flour for dusting your work surface

Method:

  • Bring the butter, Molasses and Golden Syrup to a gentle simmer mix well, remove from heat, allow to cool.
  • Sieve the flour, baking powder, Mixed spices, Cinnamon and Ginger together and set aside
  • Add the egg to the cooled butter syrup and mix well
  • Mix together the Bicarbonate of Soda and Vinegar, mix into the butter syrup
  • Add the butter syrup to the flour, fold through to make the dough
  • Wrap the dough and rest in the fridge before rolling out for baking.
  • Pre Heat oven to 180 Degrees and bake biscuits for approximately 12 minutes

Remove the dough from the fridge. Very lightly sprinkle some flour on your work bench. Roll out the dough to about 3-4mm thick. I like to dip the cutting edge of the cookie cutter into the flour shake off the excess and then cut the shape (repeat till you have cut out all) Gently lift the dough shapes onto the prepared baking trays. Leave a good 1-2cm between each shape.

Bake the gingerbread for about 12 minutes (you know your oven, sometimes they run hotter than others so watch the first batch and adjust your time accordingly). Allow the baked gingerbreads to cool slightly on the baking tray before you move them to a cooling rack to cool completely before decorating.

To decorate your Gingerbread you will need some

Royal Icing

Small Pipping Bag

Sprinkles – Ive used Queens White Soft Shell Pearls (which are great ….No more chipped teeth using the other hard ones “Great Ideas Queens”

Mixed Red and Green Sprinkles for the Garland Wreath

Black or Brown Food Colour Pen to draw on the face (which can only be done after the royal icing has completely dried……don’t be tempted to do it any sooner, trust me! )

Step 1

Fill the piping bag with royal icing (2-3 Tablespoon full) cut the tip of the piping bag so that you can pipe a line. If the royal icing is too runny thicken it up with a little more icing sugar or if too thick add a tiny amount of water (a little goes a long way)

Step2

Trace the shape of the angel all the way round, allow this to dry as you finish the other baked gingerbread.

Step 3

Once the outer edge is dry, time to fill it in. This time you want the royal icing to have a little movement so that it will spread easy but not run away ….if you know what I mean 🙂 Using the same piping fill it with the royal icing again and slowly fill in.

Step 4

Once again wait till the royal icing is dry before you continue with this step. To make the Garland wreath pipe a ring of royal icing onto the angel and sprinkle with the sprinkles. Allow it to set and then shake off the excess. For the hallow pipe a line of royal icing and then gently place the soft shell pearls across and allow to set dry.

Now the rest is up to you! I like to put the angels in clear food / lolly bags tie some colourful ribbon over the top and give them as gifts. Ive used them as name cards for Christmas lunch. Ive even used them as ornaments on the christmas tree. What ever you choose to do Im sure they will be enjoyed by all.


img_20151216_210634

img_20151216_191714


Lucy's Friendly Foods

There’s not a great deal to say about these other than they’re part brownie, part cookie… they’re chocolate brownie cookies! So they have that soft chocolate texture in cookie form, and they taste just like brownies. Best of both worlds, right? They got a thumbs up here anyway.

Chocolate Brownie Cookies (dairy-free, egg-free, nut-free, soya-free, sesame-free, vegetarian and vegan)

IMG_6275

makes 10-12

  • 1/2 cup plus 2 tbsps plain flour
  • 1/4 cup cocoa powder
  • 1/4 tsp baking powder
  • 1/2 tsp bicarbonate of soda
  • 1/3 cup sugar
  • 1/4 tsp salt
  • 1/4 cup sunflower oil
  • 1 tsp vanilla extract
  • 3 tbsps oat milk
  • 1/2 cup chocolate chips

– Preheat the oven to gas mark 3

– Line a cookie sheet with parchment

– Sift together the flour, cocoa, baking powder and soda. Stir in the sugar and salt.

– Pour in the oil, vanilla and oat milk.

– Bring together to a dough.

–…

View original post 61 more words

Coconut Blossom Caramel Sauce


CSR SUGAR Australia has released a beautiful range of traditionally farmed sugars. Each one with its deep rich and delicate notes of caramel, butterscotch, toffee and treacle. The unique molasses content in each gives the unrefined sugar its golden colour and decadent flavour.

So I thought I’d put it to the test!

I adore this recipe it can be use in cakes and buttercreams or warmed and drizzled over ice cream, puddings or eaten straight up with your favourite spoon or simply smear over toast.

IMG_20151027_104225

Be creative Ive made this recipe with all of the different sugars and each time its been a delicious result. So make a caramel sauce to suit your personality and your taste buds.

France – French Caster Sugar

Colombia – Panela Sugar

Sri Lanka – Rapadura Sugar

Indonesia – Coconut Blossom Sugar

Australia – Muscovado Sugar

IMG_20151027_103919

COCONUT BLOSSOM CARAMEL SAUCE

Makes about 1  1/2 cups

UTENSILS

1 x 2 Liter Heavy base saucepan

1 Candy Thermometer

1 Whisk

1 Heatproof jar with lid to store your caramel

INGREDIENTS

125g Cream

60g  French Caster Sugar

60g Coconut Blossom Sugar

60g Unsalted Butter

45g Glucose

1/4 tsp Salt

——————————–

1/2 tsp Vanilla Bean Paste

125g Cream

METHOD

Bring the 125g Cream, sugar, butter, glucose and salt into the heavy base saucepan uncovered over medium to high heat. Once the sugar has dissolved  whisk the mixture just a few times to combine and continue to boil till the mixture reaches 120 Degrees Celsius take off heat.

Add the vanilla and cream in a thin stream while whisking constantly till well combined. Place back on the heat and boil again. Remove from heat straight away. Allow to cool for a moment.

Pour the caramel into a heat proof container.

Leave to cool then cover it tightly and store in refrigerator.

Re-heat to use.

Don’t forget this caramel sauce makes a great gift too!

Enjoy 🙂

Strawberry Fields

11224382_525907130896358_3475184211368373573_n

“Strawberry Fields” 

Makes one serve, but feel free to share!
1 cup Strawberries (washed and stems removed)
1 cup Almond Milk
1 Tablespoon Honey
1 pinch Cinnamon
1 Tablespoon Almond Butter (or Peanut Butter)

Method

Place all the ingredients in a blender and blend till smooth.
Enjoy!

Get ready to “RUM BALL”!

10868071_10152617681882709_4806372427767096313_n


This recipe came about one Chiristmas many years ago when it was almost customary to give a Christmas cake as a gift to celebrate the festive season. Overwhelmed with the rich fruity and spice aroma of these gorgeous home baked fruit cakes and having been given a generous quantity…….”Well the truth be said there is only so much fruit cake you can eat”!

So the mother of invention had to intervine to produce a new Christmas tradition. Inspired to use what I had, which at the time included Chocolate and all those fruit cakes, and no baking!

1469978_10152617681957709_2159612484320561763_n

Thus the Rum Ball has now become a firm inclusion to the Christmas desserts list in my household, not to mention they make an excelent gift. One year I made them all look like minature puddings diping them firstly into the dark chocolate and then using white chocolate as the custard and a small piece of red glace cherry on top to finish. Christmas after Christmas the little rum balls took on a more refined and simplistic look perhaps the K.I.S.S (Keep it simple stupid) had finally dawned apon me. I was confronted by the subtle hints from friends and family that had enjoyed them from a previous Christmas that they loved receiving them as gifts. What a great idea!

Edible glitter transformed a little bit of Christmas into a sparkling delight for the eyes, and when all boxed, they sparkle and glisten ……”let the Christmas celebrations begin”.

Rum Ball Truffles
 Quick and Easy

Rum Balls

Ingredients:

1  x 800g Dark Chocolate Fruit Cake

1  x 480g Double Chocolate Buttercake

30ml Freshly brewed Espresso Coffee

1-2 Tablespoons Rum Extract (this is optional)

2 x 375 pkts of Dark Chocolate Melts

You will need:

Food processor (if you don’t have a Food Processor do not worry you can use your hands and a large bowl)

Small or Large Icecream Scoop (I say either, depending on how big you want to make them)

Baking Tray lined with Baking Paper (to set the Rum Balls on)

Heat proof bowl to melt the chocolate in (use the microwave using short bursts (30second) of heat, mix heat again and mix till all the chocolate has melted)

Method:

1. Crumble the fruit cake and the chocolate cake into the bowl of the food processor and pulse a few times till the cakes have become small crumbles.

2. Add the Rum essence or if you would like the adult version, add a tablespoon or two of the real alcoholic version. Add half the coffee at first, and pulse all. If the mix looks a little dry, add a little more coffee till it all comes together.

3. Scoop equal amounts of the cake mix onto the baking paper lined tray using the icecream scoop.

4. Gently roll the individual balls till nice and smooth, placing them back onto the tray and then place them into the refrigerator to set.

5. Meanwhile melt the chocolate (I use dark chocolate because I like it, but there is no reason why you shouldnt use Milk or White Chocolate…..it’s time for indulgence after all!)

6. Gently dip the balls into the melted chocolate and then ease them onto the baking paper again. I use a couple of forks to help me out with this process (at this stage you might like a second tray prepared for this purpose) as the rum ball mix was in the fridge you will find that they will set quickly.

7. Once the chocolate has set, I’ve used a little brush to add some red edible glitter. Now they are ready, well after you have enjoyed one or two. 🙂

Enjoy my ultimate Christmas Treat!


Christmas Baking Classes

I have always said that nothing say’s “I love you” or “I Care” or just “Thank you”
like a gift from home.

image002

This Christmas Baking Class will sure put a smile on everyones face with the gorgeous desserts you will learn to:

Make, Bake, Decorate and at the end of class

Take Home a wonderful sample selection of everything you have made.

BOOK NOW!

A: “Best of Bake Off”

Next Class: December, Sunday, 15th from 9.00am till 3.30pm

Only 8 places available per class.

At: LG Kitchen, Shop 90, Cecil Street, South Melbourne Market

$160 per person

A Best of Bake Off 15:12

A: In this class you will learn to make:

· Gluten Free Spiced Raspberry Tart

· Baked Honey Blossom Cheese Cake

· Choc-Orange Mini Tarts

·Mango and Raspberry Tarts

20131130_162200

BOOK NOW!

B: Christmas Desserts

Next Class: December, Sunday, 22nd from 9.00am till 3.30pm

Only 8 places available per class.

At: LG Kitchen, Shop 90, Cecil Street, South Melbourne Market

$180 per person

B Christmas Desserts Class 22:12

 B: In this class you will learn to make:

· Baked Honey Blossom Cheese Cake

· Tropical Meringue and White Chocolate Trifle *(Bowl will be provided)

· Red Velvet Swiss Roll with White Chocolate and Mascarpone cream

·Fancy Gingerbread Cookies

In this class you will learn:

· Techniques and recipes for home use

· Create your own unique decorations

· Rolling, cutting, baking dough

· Intricate assembly techniques

This slideshow requires JavaScript.

Please email your preference for:

Class  A on Sunday 15th of December 9.00am – 3.30pm

Class B  on Sunday 22nd of December 9.00am – 3.30pm

*Please note that appropriate clothing must be worn at all times, including closed-toe footwear, preferably no loose garments or extra jewellery.

*Please do not make travel arrangements until your class has been confirmed. We do not offer refunds for classes once your payment has been processed.

*Please note participants must be 18 years of age or over.

*Note: GIFT VOUCHER ARE AVAILABLE AND WILL BE SENT VIA EMAIL – MINIMUM $10.00
Vouchers are valid for a period of 365 day(s) from date of purchase.

Sugar and Spice Gingerbread

To say that there is a special place in my heart for gingerbread would be an understatement. While baking my house is filled with the sweet spicy aromas of ginger, cinnamon and clove. I think its a warmth that touches your heart and soothes the soul that feeling of comfort and security….who would of thought that a humble biscuit was this and so much more. Christmas must be around the corner but when I really think about it there’s no need to wait gingerbread is lovely any time of the year.

Ginger Bread House and Template

  Gingerbread Dough:

100g butter chopped

1 cup Brown Sugar (Firmly packed)

1/2 cup Molasses

1/2 cup Golden Syrup

1 egg (lightly whisked)

4.5 – 5 cup Plain Flour (extra for dusting)

1 Tablespoons Ground Ginger

1 Tablespoons Cinnamon

1 Tablespoons Ground Cloves

1 teaspoon Bicarbonate of Soda

Royal Icing:

1 x Queen Royal Icing (Instant mix)

Method:

1: Place butter, brown sugar, Molasses and Golden Syrup in a saucepan over low heat until the butter has melted and the sugar dissolved. Set aside for 10 min to cool. Add the egg well.

2: Sift together the flour, ginger, cinnamon, cloves and bicarbonate of soda. Add to the butter and egg mixture. Combine all and knead until smooth. Alternatively –  pour the butter mix into the bowl of a mixer with a paddle attachment and on slow add the flour mix till all comes together.

3: Wrap the dough in food plastic flatten out into a disc shape and rest in the fridge for 30 minutes.

4: Preheat oven to 180C. Roll portions of the dough out directly onto the baking paper about 3 – 4 millimetres thick.

5: Use the template to guide you and cut out the shapes required,  remove excess ginger bread dough.  Place another piece of baking paper over the dough and cover with another baking tray. (this will help to keep the gingerbread flat).

6: Bake for 12 minutes or until golden. Once baked use the template to guide you once again and trim any edges straight. Please note the gingerbread will still be soft and Very Very Very HOT! so take care.  Once trimmed transferring to a wire rack to cool completely. Repeat with remaining dough.

7: Decorate the baked ginger bread and set aside to set before assembling the structure.

After you have cut all your Gingerbread pieces any remaining dough would make perfect gingerbread figurines to enjoy with a cup of tea while showing off your masterpiece.

The decorations are really all up to you.

I have used stencils as well as the:

Queen Royal Icing

Queen Pansies

Queen Soft Sugar Pearls – Pink

Which you can find in most supermarkets in the baking section.

Biscotti – Pistachio and Cranberry

20131018_174837

More and more I look at these biscotti I am reminded that the festive season is quickly descending upon us. With all those flecks of red and green it must only mean one thing “Christmas”. Maybe I have found a wonderful solutions for the gift giving season. A gift from home to treat the taste buds for friends and colleagues to enjoy.

“That little something that means so very much, a gift from the oven is a gift from the heart”.

I have always maintained that my desire to bake has always been fuelled by the need to share, create something delicious and enjoy it with friends and family.

20131018_152405

Pistachio and Cranberry Biscotti

Ingredients

For the biscotti base

250g Plain Flour or Biscuit Flour

½ teaspoon Baking powder

220g Caster Sugar

3  Eggs, lightly beaten

200g Pistachios, chopped

125g Dried Cranberries, chopped

Zest of 1 lemon

1 teaspoon vanilla extract

  1. Preheat the oven to 160C Degrees
  2. Mix together the flour, baking powder and sugar in a bowl and add the eggs slowly to make a dough.
  3. Add the chopped pistachio and cranberry lemon zest and vanilla extract
  4. Knead the mixture gently and then separate and roll into two logs.
  5. Place on a lined baking tray and bake for 25 minutes in the preheated oven.
  6. Cool slightly and cut into 1-2cm thick slices.
  7. Reduce the heat of the oven to 150C return to the tray to the oven and bake for another 10-15 minutes, turn each biscotti over and continue to bake for another 10-15 minutes until golden-brown.
  8. Serve the hot chocolate sauce in a cup with the biscotti on the side to dunk in.

*Note: The biscotti batter may look a little wet. To shape the batter wet your hands a little to stop the dough from sticking and shape in a log.

20131018_161911

Having had so much success with Merry Berry’s Creme Caramel recipe I thought it would only be fair to test one of Paul’s recipes and Im so glad I did its simply wonderful. The Biscotti has all the flavour of freshly roasted nuts and an abundance of sugar to satisfy any sweet tooth. Do I dare to say that I have made a few little changes to the original recipe but without any disruption to the value of satisfaction.  Another recipe keeper!

This recipe was inspired by Paul Hollywood

20131018_171151

Episode 3: The Great Australian Bake Off – Gingerbread

The important lesson here is that there is a difference between the lovely aromatic soft and chewy gingerbread biscuit you can make or buy form the store and the type of recipe required to construct a house, tower or multiple piece structure. I loved the idea of Monique’s “City of Churches” construction to say the least it would have been adorable had she used a different recipe. The gingerbread was too soft and she was unable to get the panels to hold up to the weight, coupled with the fact that it was a warm day and the chocolate that was smeared on the panels didn’t set completely and added no support, such a shame.

There is a difference!

Using the correct type of gingerbread recipe will produce pieces that after baked will have a dryer, brittle, crunchy texture and therefore you will need to use a template to cut out all the necessary pieces for your structure before baking. Then allow them to cool completely before beginning your construction.  Your gingerbread pieces will need to be bonded together and hold weight of other pieces or the addition of decorative items like lollies or chocolate etc.

It’s also important to note that just because the texture of the gingerbread is dryer, the flavour and heady smell of spices is still present. The joy of taking part in devouring the gingerbread loses none of its festive appeal, especially when its accompanied by a great cup of tea or coffee or just a little something sweet for morning tea.

These are some of the amazing gingerbread constructions I have come across in my travels. Each and everyone of them were constructed with multiple pieces and generous amounts of colourful sweets to entice a smile from your inner child. I wonder what Hansel and Gretel thought when confronted with these gingerbread houses!

My very first Gingerbread house

Although a very traditional construction the end result was confronted with two dilemmas, the house looked too cute to destroy and secondly, who was going to be the first to begin the destruction. As I had made the gingerbread house the task was put upon me. “Quick, we need a cup of tea please”.

Gingerbread Spices

The traditional spices used in gingerbread have always been:

Ground Ginger

Ground Cinnamon

Ground Cloves

As every construction will need a different quantity its best to make smaller portions of the gingerbread dough and if you have any left over dough use a cookie cutter and make delicious biscuits. Just remember be mind full of the time as smaller pieces bake quicker than the larger ones.

This is a picture of the “Eiffel Tower in Bloom” the construction I made on episode 3 of “The Great Australian Bake Off”. Although I am still a little disappointed having to alter the overall look of the tower at the last minute. Im still very proud of the effort under such a trying environment……I would still happily sit bake with my favourite hot beverage and enjoy eating it!

ep3_10_mariastower

maria ep1 969343_10151547185759150_32456383_n ContestantsWalk