Episode 7: The Great Australian Bake Off – Pastry and a little Gluten free


Signature Bake Challenge was all about  Gluten Free. 

I have always lover the traditional Linzer tart its one of the worlds oldest recorded recipes. This inspired me to take something old and make it new, well the best way I know how.  Off course if you don’t like raspberry you can make strawberry jam or even plum it all works beautifully together. The pastry is lovely to work with and no rolling pin required.

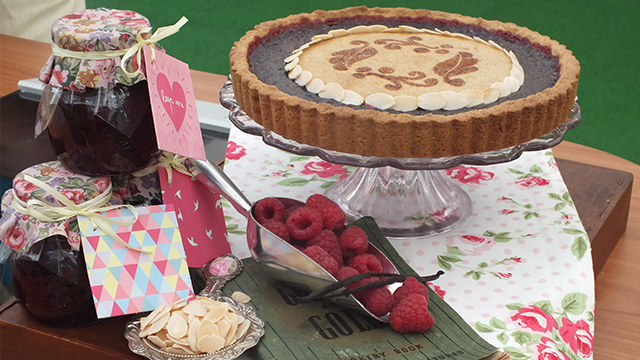
“Spiced Raspberry Tart”

13_mariatart

1146536_434098646706378_1619758067_n

Shane’s in love with raspberry jam!

16282_434098886706354_100309812_n

We are all enjoying some of Monique’s left over figs…..delicious!

Technical Bake Time!

556466_10151625728674150_250230391_n

The dreaded technical bake was soon to follow, the French crescent moon the Croissants!  Even though it caught us by surprise it was the first time I felt a little at easy. This was the first technical bake that I had made at home and even though it was almost 10 years ago for the first time I felt a little confident…..as scary as that sounds.  My croissants didn’t fail me they were golden and flaky all puffed up Im sure I made this french pastry proud. Judgment time and they got “1st” YAY!

1150137_10151625733499150_26372314_n

The ALL important “SHOWSTOPPER”

20130817_172631_4_bestshot

“STRUDEL” I think I can still hear host Shane saying “STRUDEL”

I had watched my grandmother and mother use the method of stretching the wet dough to make these supper fine sheets it take patience and a very large table. But in my wisdom I chose to make the Filo Pastry the traditional way using a very thin long rolling pin and a copious amount of cornflour which helps to stop the pastry from sticking together. Once this process has been completed each sheet is coated in golden melted butter to help the sheets cook and crisp through as well as add enough flavour to appease and French pallet. The real challenge with a strudel “no-mater” what the filling is the final presentation and I think a simple stencil and some sugared cinnamon was just the touch my strudel needed.

20130820_212322

546896_10151625752319150_1877066558_n

4_studdlefig

RECIPE!

20130817_173926_2

Gluten Free – Spiced Raspberry Tart

Ingredients

Serves 10 – 12
For the pastry
  • 1 cup almond meal
  • 250g gluten-free flour
  • pinch of baking powder
  • pinch of bicarbonate of soda
  • 3 teaspoons icing sugar
  • ½ teaspoon ground ginger
  • ½ teaspoon ground cinnamon
  • ½ teaspoon ground cloves
  • 200g butter
  • 1 free-range egg yolk
  • 1 vanilla pod
  • zest of 1 lemon
For the jam
  • 1kg raspberries
  • 1kg A1 sugar
  • 3 tablespoons water
  • 3 tablespoons lemon juice
  • ¾ x 50g packet Jamsetta (pectin)
To finish
  • ½ cup sliced almonds
  • 1 free-range egg yolk, beaten, for the egg wash
  • cinnamon and stencil for dusting
Utensil
  • 1 x 25cm fluted loose-based flan tin

Preparation Method

Place the almond meal, flour, baking powder, bicarbonate of soda, icing sugar, spices and butter into a food processor bowl and process until the mixture resembles breadcrumbs. Add the egg yolk through the feed tube and process until combined. Split the vanilla pod and scrape the seeds into the dough along with the lemon zest.

Place the dough onto a floured worktop and knead lightly until smooth. Cut off one-third and roll into a ball. Shape the remaining pastry into another ball. Wrap in cling wrap and chill for 20 minutes.

Roll out the larger pastry ball. Line the tin, then place it back in the fridge to rest the pastry. (A hint for rolling out this pastry, as it is quite crumbly: spray your worktop with oil. Place a large piece of cling wrap on top and roll the pastry out onto it. This will make it easier to pick up.) Roll out the smaller piece of pastry onto baking paper. Cut a small circle (18cm) to sit on top of the tart. Chill the base and top for 10 minutes.

Preheat the oven to 150°C. Wash the raspberries. Place the sugar in a deep pan and heat in the oven for 6 minutes. Place the raspberries in a separate heavy- based pan with the water and lemon juice. Mash the fruit and add the warmed sugar and Jamsetta, stirring constantly. Bring to the boil and cook, bubbling, for 5—10 minutes. Skim off any scum and discard. (To test if the jam is set, place 3 saucers in the freezer. Once cold, place 1 level teaspoon of jam on the first saucer. If set, the jam should wrinkle once cool; if not continue cooking for a further 3 minutes and test again on a fresh saucer.)

Preheat the oven to 180°C. Fill the chilled pastry case with the jam and cover with the decorated circle of pastry. Place almonds around the circle. Brush the pastry with egg wash and bake for 20—25 minutes. Decorate by sifting the cinnamon over the stencil before serving.

Thank you to judges Kerry Vincent and Dan Lepard

for there wonderful comments and off course being chosen as STAR BAKER.

13_mariatart

Episode 6: The Great Australian Bake Off – Time for Dessert

Red Velvet “Sweet Heart’s” Cake

1146461_222165601270514_931772242_n

As six Home bakers remained our next challenge was all about dessert.

As you would have see and heard this particular showstopper was always destined to be my favourite. Everything about this cake for me said romance the colour, the flavour down to the decorations. We had five hours to make bake, frost and decorate!

Image

Image

Red Velvet Engagement Cake
(Serves 60–80)

Ingredients

For the first cake
  • 1 cup rice bran oil
  • 2 cups caster sugar
  • 1½ tablespoons dark cocoa powder
  • 4 teaspoons red food dye
  • 3 cups self-raising flour
  • 1¼ teaspoons salt
  • 1¼ teaspoons vanilla bean paste
  • 1¼ teaspoons bicarbonate of soda
  • 1¼ teaspoons white vinegar
  • 3 large free-range eggs
  • 1¼ cups buttermilk
For the second cake
  • 1 cup rice bran oil
  • 2 cups caster sugar
  • 1½ tablespoons dark cocoa powder
  • 4 teaspoons red food dye
  • 3 cups self-raising flour
  • 1¼ teaspoons salt
  • 1¼ teaspoons vanilla bean paste
  • 1¼ teaspoons bicarbonate of soda
  • 1¼ teaspoons white vinegar
  • 3 large free-range eggs
  • 1¼ cups buttermilk
For the third cake
  • ½ cup rice bran oil
  • 1 cup caster sugar
  • ¾ tablespoon dark cocoa powder
  • 2 teaspoons red food dye
  • 1½ cups self-raising flour
  • ½ teaspoon salt
  • ½ teaspoon vanilla bean paste
  • ½ teaspoon bicarbonate of soda
  • ½ teaspoon white vinegar
  • 1 large free-range egg plus 1 yolk
  • ¾ cup buttermilk
For the frosting and filling
  • 250g unsalted butter, softened
  • 500g cream cheese
  • 1 teaspoon vanilla extract
  • 2 cups icing sugar, sifted
To finish
  • white fondant
  • quilting tool
  • royal icing
  • red gel food dye
  • stencils
  • 12 red roses
  • florist tape
  • lustre dust
Utensils
  • 2 x 25cm, 2 x 20cm and 2 x 15cm cake tins, greased and lined with baking paper
  • wooden dowel

Preparation Method

Preheat the oven to 170°C. To make the first batter, combine the oil, sugar, cocoa, food dye, flour, salt, vanilla, bicarbonate of soda and vinegar in the bowl of a freestanding electric mixer and mix on low speed. Increase the speed to medium. Add the eggs one at a time, until combined. Slowly add the buttermilk to make a thick batter. Pour into a 25cm and a 20cm tin and bake for 40—45 minutes or until a skewer inserted in the centre comes out clean.

Make the second batter (the same way) and pour into the second 25cm and 20cm tins. Bake as above. Make the third batter and divide between the two 15cm tins. Bake for 35 minutes or until a skewer inserted in the centre comes out clean.

In a large bowl, cream the butter and cream cheese together until light and fluffy. Mix in the vanilla. Add the icing sugar a few spoonfuls at a time, beating until light and fluffy. Cut each cake in half and fill with frosting, then sandwich back together. Place frosting between each of the same-sized cakes to sandwich together and form a tier. Place each tier on a matching-sized cake board secured with a little frosting. Cover the top and sides of each tier with cream cheese frosting and place in the fridge to set. (You will now have three frosting-covered tiers.)

Roll out the white fondant until smooth and cover the base tier and the top tier. Using a quilting tool, add decoration to the base tier. Pipe a fine lacework pattern of dots on the top tier using royal icing. Add enough red food gel to make bright red fondant, knead well and roll out to cover the middle cake tier. Smooth. Cut out red fondant hearts, stencil with patterns and secure to the red tier with royal icing.

When ready to assemble, insert 3—4 wooden dowel pieces, cut to size, in the base tier to support the middle tier. Put the middle tier in place. Add more dowel pieces, cut to size, to the middle tier to support the top tier. Place the final tier on top. Finish the cake by topping with red roses wrapped in plastic or florist tape (so the stems do not touch the cake). Sprinkle a little lustre dust over the roses.

Image

 The Signature Challenge – Cheesecake

Through out these challenges week after week I have always tried to create something that everyone can be inspired to bake at home, no fancy gadgets or unattainable complex ingredients. I have tried my best to show how I bake at home. This cheese cake has all the citrus notes of both orange and lemon, the sweet fragrance of honey and spice. Well it all begins with a picture!

Image

A step by step view

10_maria

Image

SONY DSC

SONY DSC

SONY DSC

Honey & Orange Blossem Rose

Ingredients List:

Please supply us with an ingredients list for your Baked Cheesecake (below)

Base:

1 pkt Ginger nut biscuits (Crushed)

1 t Cinnamon powder

100g Butter (Melted)

Filling:

750g Cream Cheese (Room temperature)

1 c Caster Sugar

1 T Orange Blossom Water

1 each Orange and Lemon Zest (fine)

1/4 c Milk

3 eggs

1/2 c Light Sour Cream

1 T Vanilla Bean Paste

Honey Jelly:

100 ml Hot Water

1 T Gelatine

300 ml Water

2 T Honey

2 Drops of Queens Rose Pink Food Colouring

1 T Rose Water

1: Put 100ml of hot water and gelatine stir to dilute add sugar, honey and food colouring. Add 300ml of cold water and stir to combine. Allow the jelly to come to room temperature.

2: Allow to cool slightly before pouring onto the cheese cake. Place the cheese cake in the fridge to set before piping the cream.

Topping: Whipped Cream

1 1/2 c Cream

2 T Icing Sugar

Garnish:

Fresh 8 x Pink and 8 x Yellow Rose petals (few extra of each)

Method:

Pre-heat the oven to 170C. Bake for 50 minutes in a water bath.

Grease and line with baking paper one 10 inch springform cake tin outer base covered with foil, to be placed in a deep baking dish for a water bath.

1: Place all in a food processor add the crushed biscuits and melted butter and pulse till fine crumbs. Press an even layer into the base of the cake tin its optional but you can line the sides too.

2: Using a large standard mixer (medium speed) cream together the cream cheese, sugar, zest of lemon and orange and the orange blossom water until smooth.

3: Add the milk and beat till smooth (on low to start).  Add the eggs one at a time beating well after each addition. Add the sour cream, vanilla bean paste beat until combined.

4: Pour the cheese mixture into the cake tin. Making sure that the cake tin is water proofed with the addition of foil wrapped around and up the sides of the outer edges. Place the cake tin into a deep dish and add hot water about a third of the way up around the tin.

5: Bake for approximately 50 minutes, leave the cheesecake to cool completely, place in the fridge, to firm before decorating (preferably overnight but at least 4 hours).

6: Whip the cream till almost thickened and them add the icing sugar to sweeten. Fill a piping bag with the whipped cream and pipe a neat circle around the edge. Place it back in the fridge again. Make the honey jelly as you are using hot water leave the jelly to come to room temperature before pouring it slowly into the inner edges of the cold cheesecake leave in the fridge to set.

7: Once the jelly has set pipe large rosettes of cream around the edge of the cheesecake about 8 equally spaced (approximately the size of a 20 cent piece). Place pink and yellow rose petal on the cream swirl all round the cake.

Ta-Dah! I hope you enjoy my recipe!

A word of advice once you have made “HOME MADE CHEESECAKE” nothing will ever taste as good!

1000577_590362747683220_1896086188_n

6_fivebakers

Episode 5: The great Australian Bake Off – Bread

 Its all about BREAD!

I cant help but love this episode, bread is such a staple in our home. My signature bake is a bread that I bake often and it always takes pride of place on the dinner table and equally for a picnic served hot or cold. Although I have always enjoyed the traditional flavours of the Spanakopita filling I don’t feel restricted. I have added roasted pumpkin, sun-dried tomatoes and chorizo to this mix and the result has always been delicious.

This morning I baked on the Channel 9 Mornings program, with a backdrop of Greek flags and Ben and Sarah having lots of fun smashing plates and the Zorba music playing in the background I felt a real sense of pride for my Greek heritage.  A proud overwhelming feeling of joy that I am able to share this recipe with you all!

Image

Watch a very quick step by step taping on how to make the Platted Spanakopita Bread

7_bread

http://channelnine.ninemsn.com.au/blog.aspx?blogentryid=1134330&showcomments=true

Platted Spanakopita Bread – Free Form Yeast Loaf

Ingredients List:
2 t Dry yeast
1 t Caster Sugar
2 1/2 c Bakers Flour
1 teaspoon Bread improver
1 t salt
1 c Water
1 T olive oil
Egg-wash:
1 egg yolk
1 T Milk
2 T Sesame seeds
Filling
1 Bunch Fresh Spinach
300g Danish Feta
3/4 cup Grated Mozzarella, Parmesan and Cheddar Cheese
2 Tablespoons Fresh Dill (Chopped)
2 Tablespoons Fresh Mint (Chopped)
1 Spring Onion (thinly sliced)
2 Tablespoons Pine nuts
Freshly ground Black Pepper
 
Method:
1: To make the dough. Attach the dough hook on your standard electric mixer. In the mixing blow add the dry ingredients, yeast, sugar, flour, bread improver and salt in a bowl. Mix all ingredients very well then add the water and oil.  Should take about 5 minutes.
2: Mix all the dough ingredients together till the dough comes away from the sides of the bowl this should take about 5 minutes.
3: Once the dough looks elastic, place it into an oiled bowl cover with plastic wrap to prevent drying and set aside in a warm place draft and light free till doubled in size.
4: Meanwhile to make the filling. Wash the spinach leaves and remove all of the stalk. Slice the spinach taking care to remove excess moisture from the leaves place in a large bowl. Add to this the crumble the feta the pine nuts,  grated cheeses chopped fresh mint and dill and thinly sliced spring onion. Mix all well.
5: Preheat the oven to 200C (please note that most ovens need about 15 – 20 minutes to reach maximum temperature)
6: Turn the dough out onto a lightly floured surface or onto a piece of baking paper (the same size as the baking tray you are going to use) and flatten out the dough with the palms of your hands to form a rectangle shape approximately 40cm x 30cm allow the dough to rest for a minute before adding the filling.
7: To cut the dough ready for the braid first remember to leave a 10cm width of dough uncut down the middle of the dough as this is where the filling will sit. Cut with a knife 8 by 8 cm lines on the left and right side of the dough creating eight fingers on either side these will be used to wrap over the filling creating the braid.
8: Add the filling straight down the centre of the dough. Then pick up one strand at a time alternating as you go and criss cross pushing each braid finger into the inner edge to anchor down.
9: Line a flat baking tray with baking paper place the braided bread onto the tray and allow it to rest for a further 15 minutes (this is the proving time) lightly cover the braided bread with some plastic wrap and set aside in a warm area that has little draft or light.


10: Once the dough has rested and almost doubled in size again brush on the egg wash sprinkle with sesame seeds and bake for approximately 25 minutes or until golden.
Image
Image
1002178_428565180593058_1517203292_n
Image
Orange and Walnut Rosettes makes 12 (large muffing size)
Ingredients:
For the dough
  • 3 x 7g sachet dried yeast
  • 250ml lukewarm milk
  • 3 free-range eggs
  • 5 cups plain flour, sifted, plus extra for kneading
  • ½ cup caster sugar
  • ¼ teaspoon salt
  • 125g butter, melted
  • ½ teaspoon vanilla extract
For the filling
  • ½ cup butter, softened
  • 2½ tablespoons caster sugar
  • zest of 2 oranges
  • 2 teaspoons orange juice
  • 3 teaspoons cinnamon
  • 1 teaspoon vanilla bean paste
For the topping
  • 1 free-range egg yolk, beaten with 1 teaspoon water, for the egg wash
Utensils
  • 1 x 12-hole large muffin tray, lined with paper muffin cases

Method

Dissolve the yeast in the warm milk, beat in the eggs, and then mix in the flour, sugar and salt. Add the melted butter and vanilla and mix until evenly combined (it is easiest to use your hands). Cover and leave in a warm place until risen by half (about 30 minutes).

Combine the orange filling ingredients and chill to keep firm but still spreadable.

Gently flatten the dough and cut it into 12 equal portions. Roll out each portion into a rectangle about 8 x 24cm. Spread the orange filling ingredients along the centre of the dough. Fold the dough over the filling to encase it.

To make the rosette, tie the dough into a knot, wrapping the top loose end of the knot under the roll and pushing the bottom loose end firmly into the centre of the roll. Place each rosette on the baking tray. Cover and leave somewhere warm until almost doubled (approximately 30 minutes).

Towards the end of the rising time, preheat the oven to 180°C. Brush the rolls with egg wash and sprinkle with the chopped walnuts (if using). Bake for 25 minutes or until the rolls are golden and sound hollow when tapped underneath.