Biscotti – Pistachio and Cranberry

20131018_174837

More and more I look at these biscotti I am reminded that the festive season is quickly descending upon us. With all those flecks of red and green it must only mean one thing “Christmas”. Maybe I have found a wonderful solutions for the gift giving season. A gift from home to treat the taste buds for friends and colleagues to enjoy.

“That little something that means so very much, a gift from the oven is a gift from the heart”.

I have always maintained that my desire to bake has always been fuelled by the need to share, create something delicious and enjoy it with friends and family.

20131018_152405

Pistachio and Cranberry Biscotti

Ingredients

For the biscotti base

250g Plain Flour or Biscuit Flour

½ teaspoon Baking powder

220g Caster Sugar

3  Eggs, lightly beaten

200g Pistachios, chopped

125g Dried Cranberries, chopped

Zest of 1 lemon

1 teaspoon vanilla extract

  1. Preheat the oven to 160C Degrees
  2. Mix together the flour, baking powder and sugar in a bowl and add the eggs slowly to make a dough.
  3. Add the chopped pistachio and cranberry lemon zest and vanilla extract
  4. Knead the mixture gently and then separate and roll into two logs.
  5. Place on a lined baking tray and bake for 25 minutes in the preheated oven.
  6. Cool slightly and cut into 1-2cm thick slices.
  7. Reduce the heat of the oven to 150C return to the tray to the oven and bake for another 10-15 minutes, turn each biscotti over and continue to bake for another 10-15 minutes until golden-brown.
  8. Serve the hot chocolate sauce in a cup with the biscotti on the side to dunk in.

*Note: The biscotti batter may look a little wet. To shape the batter wet your hands a little to stop the dough from sticking and shape in a log.

20131018_161911

Having had so much success with Merry Berry’s Creme Caramel recipe I thought it would only be fair to test one of Paul’s recipes and Im so glad I did its simply wonderful. The Biscotti has all the flavour of freshly roasted nuts and an abundance of sugar to satisfy any sweet tooth. Do I dare to say that I have made a few little changes to the original recipe but without any disruption to the value of satisfaction.  Another recipe keeper!

This recipe was inspired by Paul Hollywood

20131018_171151

Mary Berry’s Classic Creme Caramel – Step by Step

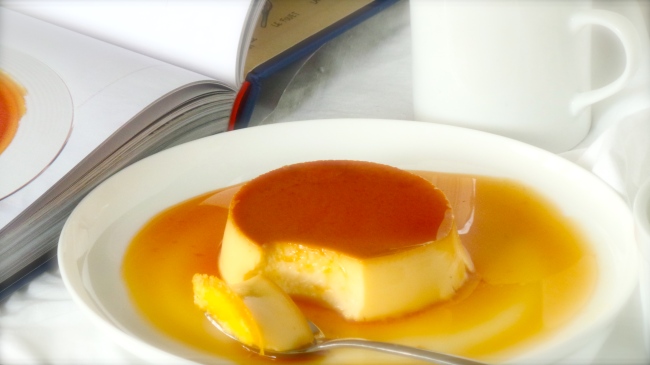
Im sure that the last time I made this beautiful baked custard I was nine years younger. Why did I wait so long?

Image

While watching another wonderful episode of “The Great British Bake Off” the technical bake was Merry Berry’s very own Creme Caramel put to the test by the unsuspecting home bakers. Im sure they only had about two hours to complete this bake which can be achieved but realistically to achieve the best result and following Merry’s recipe as she has suggested leaving the Creme Caramel to set and cool completely overnight…..a far cry from the two hour limit given to the stressed contestants but then these are the perils of reality TV!

Lets do this step by step.

Classic crème caramel

Mary Berry’s simple step-by-step guide to the perfect crème caramel.

Equipment and preparation:
you will need 6 x size 1 (150ml/¼ pint) ramekins.

Ingredients: For the caramel
160g/6oz sugar
6 Tablespoons Water

unsalted butter, for greasing the ramekins

For the custard

4 free-range eggs
1 tsp vanilla extract
25g/1oz caster sugar
600ml/1 pint full-fat milk
pouring cream, to serve

Preparation method
Pre-heat oven 150C/300F/Gas 2. Warm the ramekins in the oven, so they are warm when the caramel is poured in.

First make the caramel.
Pour the sugar and six tablespoons of water into a clean stainless steel pan.
Dissolve the sugar slowly, stirring with a wooden spoon over a low heat.
When there are no sugar granules left, stop stirring and boil until the sugar turns a dark copper colour.
Remove immediately from the heat to ensure the caramel does not burn. Quickly pour the caramel into the warmed ramekins.
Set aside to cool and become hard. (Do not put in the fridge because the sugar will absorb moisture and go soft and tacky).
Once hard, butter the sides of the ramekins above the level of the caramel.


For the custard, whisk the eggs, vanilla extract and caster sugar together in a bowl until well mixed.
Pour the milk into a saucepan, gently heat over a low heat until you can still just dip your finger in for a moment, then strain the milk through a fine sieve onto the egg mixture in the bowl.
Whisk together until smooth, then pour the mixture into the prepared ramekins.
Stand the ramekins in a roasting tin and fill the tin half-way with boiling water from a kettle.


Cook in the oven for about 20-30 minutes or until the custard has set. Do not overcook the custard – check around the edges of the dishes, to make sure no bubbles are appearing.
Take the crème caramels out of the oven, remove the ramekins from the tray and set on a cooling rack. When cool, transfer to the fridge overnight so that the caramel is absorbed into the custard.
To serve, loosen the sides of the custard by tipping the ramekin and loosen with a small palette knife round the edges. Place a serving dish on top of the ramekin and turn upside down.

2013-10-05 10.57.12

Well I have to say that Mary’s recipe is a winner, and I have even added it to my list of favourites and Im sure it’s not going to be another nine years before I make it again. The custard is just velvety smooth and not to sweet but the caramel makes up for it and I love that!