“Kolokithopita”….Greek Ruffle Sweet Pumpkin Pie

13233119_10153654524032709_2693906261553550733_n

Now I know there aren’t that many ingredients and well the method seams relatively simple but trust me this is BIG on flavour.

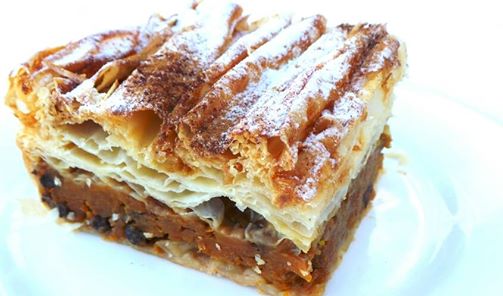
This is my favourite childhood dessert. My mother was taught by my grandmother and I make it for my friends and family too. I love pumpkin and I’ve made this pie for friends that have never enjoyed eating this glorious orange coloured vegetable as a savoury addition to a meal  let alone as a dessert…….and “they have loved it”. The aroma of it baking in the oven, the butter caramelising the fillo pastry and the smell of the sweet spiced pumpkin makes for one heavenly combination.

20160621_123358

20160621_132929

20160621_142440

20160621_143121

20160621_143338

20160621_143752

20160621_144202

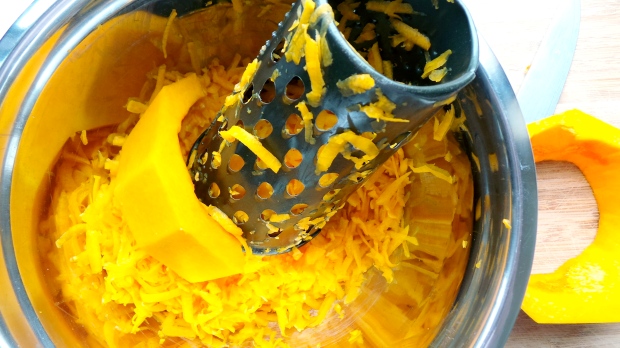
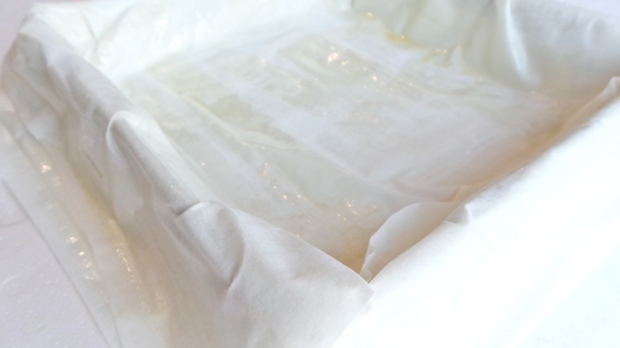
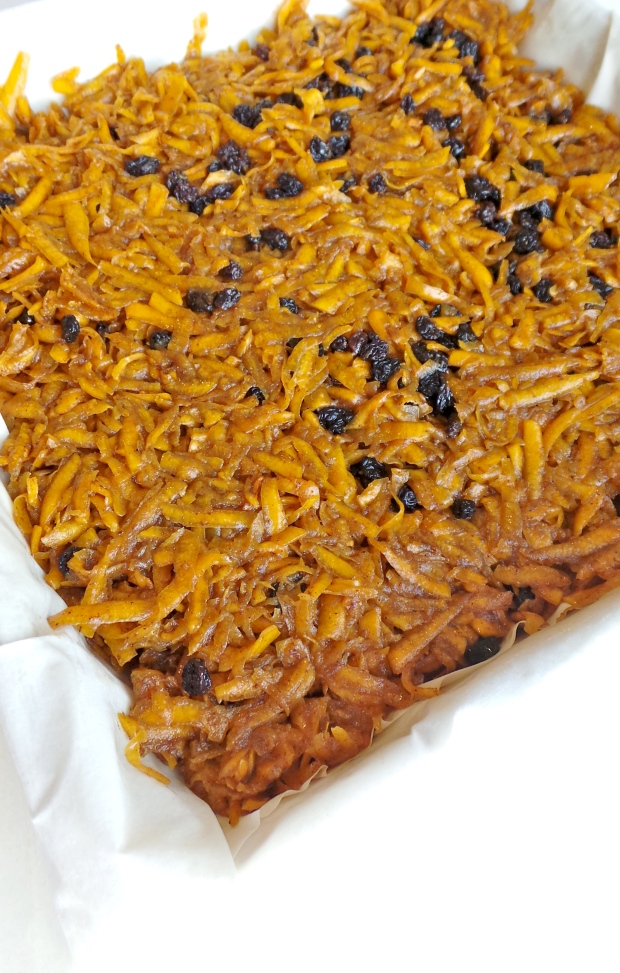
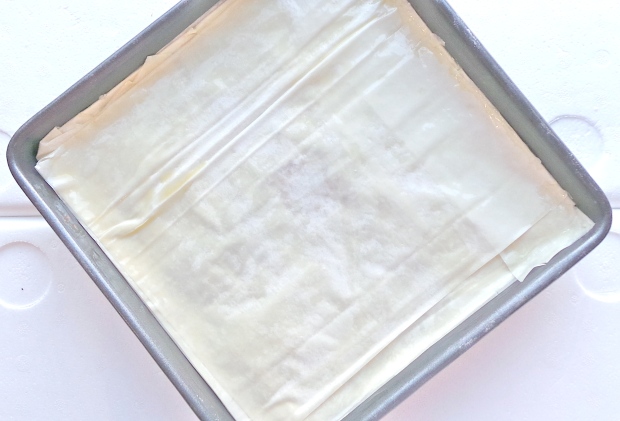
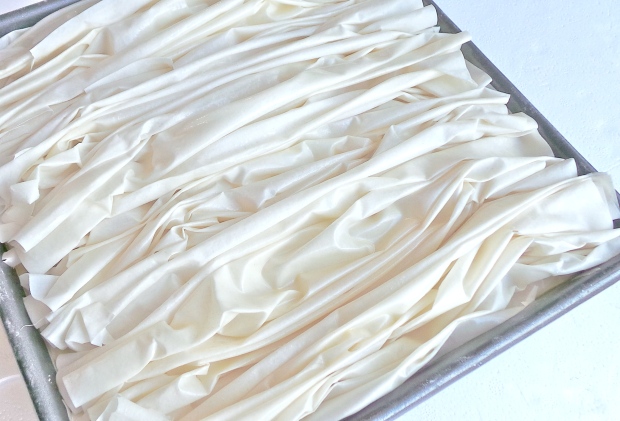
Utensils:
1 large bowl
1 Vegetable grater
1 Deep baking pan 25cm x 25cm x 5cm (a little bigger is ok)
1 pastry brush

Ingredients:
600g Pumpkin (peel and seed discarded the pumpkin flesh grated)
80g Sugar (I like to use Coconut Sugar)
80g Currants
1/2 Tbs Cinnamon powder
1/4 tsp Clove powder
1/2 Orange Zest only (optional)
1/2 tsp Salt
1pkt Fillo pastry
100g Unsalted butter melted (cooled to room temperature)
30g  Rice Bran oil

Method:
1: Grate the pumpkin and place in a deep bowl

2: Add the sugar, currants, spices, salt and orange zest mix well cover the bowl with cling film and set aside for approximately 30 minutes.

When you are ready to assemble preheat the oven 170 Degrees(fan forced)

3: Butter the deep baking pan. Lay flat 1 sheet of fillo pastry and brush 
with butter line the inside of the baking dish then repeat with the next 
filo pastry sheet till you have 4 pastry sheets lining the base and edges. 

*You will need to be a little creative when you lay out the sheets making  sure to cover the edges and leave any excess hang over the lip of your 
baking dish as you will flip it over when you have added the filling.

4: Pour the pumpkin filling in spread evenly. Fold over any over hanging 
pastry. Butter 2 more sheets of pastry and lay them over the top of the filling - make sure to fold over and execs pastry this time so that all the 
top layer is nice and flat.

5: Butter 2 more sheets this time you will need to cut them to size so thatthey fit perfectly. Make fillo ruffles by gently making folds and gently 
scrunching then together and placing on top. Repeat the till the top is 
completely covered. You will need about 7 sheets or more. 

6: Bake for approximately 35 - 45 minutes or till the pastry is golden 
brown. 

Ive always served this dessert at room temperature dusted with icing sugar or you could try agave powder and just a little more cinnamon powder. if you would like to serve it hot then a nice scoop of vanilla ice-cream is     perfect.
20160512_095816

I hope you all enjoy my very own child hood favourite. 

20160512_095421

Note: 
tps = teaspoon
TBS = Tablespoon


Artful is the new Rustic!

If the thought of a recipe described as RUSTIC sends shivers down your spine consider this!

“Artful is the new Rustic!

20140429_124020~2

Bread can be described as wholesome, earthy, crusty and rustic. Countries live and breath by the bread they make and have further developed a measure of quality by which a baker is referred to as, most popular being “Artisan Bread” or “Artisan Bakers”!

Why is it that a recipe handed down from Great Grand-mother to granddaughter not warrant the same respect , the feeling of deep admiration for a carefully crafted recipe measured not by grams but handfuls and the feel of the dough being carefully nurtured through every step.

“Don’t get me wrong I love the careful precision and craftsmanship produced in modern patisserie”

My point is we need to recognise that there is true art to be seen, valued and admired if only we looked closer with a child like wonder and used our sense of smell and our curiosity to enjoy the amazing baked spectacle that has been crafted together to produced a canvas of colour and long lasting memories.For all the recipes handed down for us to enjoy and to all the  “Artful Bakers”

” THANK YOU”

Pastry
Pastry
Home made Apricot Jam
Mixed Sultanas, Currants, Orange Peal
Mixed Sultanas, Currants, Orange Peal & Mixed Spices
20140429_120029~2
Egg wash and a sprinkle of Demerara Sugar

Ingredients:

160g Self-Raising Flour

2 Tablespoons Icing sugar

1 Tablespoon Custard Powder

100g Butter – Unsalted

1 Egg

65g Light Sour Cream

Filling:

1 cup mixed dry fruit (Sultana, Currant, Mixed Peal)

Apricot Jam (optional Raspberry is lovely too!)

Cinnamon Sugar (optional)


Egg-Wash:

1 Egg yolk

1/2 Tablespoon Milk

You will Need:

1 Baking sheet lined with baking paper

1 pastry brush

Rolling Pin

Method:

Pre-heat oven 180 Degrees

1: In a food processor add Self-Raising Flour, Icing sugar, Custard Powder and Butter process until the mixture resembles breadcrumbs. If you don’t have a food processor rub the ingredients together using your fingertips.

2: Add the egg and sourcream, bring the mixture together to form a dough ball. Do not over work the pastry.

3: On a floured surface use a rolling pin to roll out the pastry 4 – 5 mm thickness.

4: Brush the apricot jam over the pastry surface, then sprinkle with cinnamon sugar and lastly sprinkle over the mixed fruit. Gently roll the pastry. Place it on the baking tray brush with the egg wash and sprinkle the demerara sugar on top.


4: Bake till golden 25 – 30 minutes.

I hope you and your family enjoy this “Artful bake” 🙂

Happy Baking


Toffee Cream Choux – Episode 8 : The Great Australian Bake Off

maria show stopper ep 8
SS_Maria_ToffeeCream
Toffee Cream Choux

Ingredients

Toffee Cream Choux Makes 18
For the pastry
  • 1 cup plain flour
  • 100g unsalted butter
  • 1 teaspoon salt
  • 250ml cold water
  • 3 free-range eggs plus 1 additional egg yolk
  • 1 free-range egg, beaten, for the egg wash
For the custard cream
  • 1¼ cups milk
  • ½ teaspoon vanilla extract
  • ½ cup caster sugar
  • ⅓ cup plain flour, sifted
  • 3 free-range eggs plus 1 additional egg yolk
  • 1 teaspoon butter
  • 20g white chocolate
For the toffee
  • 150g a1 sugar
  • 20ml water
  • 1 tablespoon glucose syrup
To decorate
  • 24 small fondant flowers or butterflies
Utensils
  • 2 baking trays, greased
  • silicone sheet

Preparation Method

Preheat the oven to 190°C. Sift the flour into a bowl. Put the butter, salt and water in a heavy-based pan and bring to the boil over a medium heat. As the water comes to the boil, remove from the heat and dump in the flour in one go. Immediately stir briskly with a wooden spoon until the flour and liquid are evenly combined.

Place the pan back on a lower heat. Beat continuously for a minute until you have a coherent mass that comes away easily from the side. Remove from the heat and leave to cool for about 3 minutes. (If you add the eggs immediately, the mixture may curdle.)

Beat the first 3 eggs into the mixture, one at a time, making sure each egg is completely incorporated before adding the next. The mixture should be smooth and glossy. If it is too stiff, trickle in some of the additional egg yolk, beating well.

Leave to cool to room temperature. Fit a piping bag with an 18mm round nozzle and fill with the choux mixture. On a greased baking tray pipe 9 balls around the size of a walnut. Repeat with a second tray. Press the tops down with a wet finger. Brush the tops with egg wash. Bake for 15 minutes at 190°C, then lower the temperature to 160°C for a further 10 minutes until golden brown and puffy. Remove from the oven and make a small slit in the base of each ball. Turn off the oven. Return to the oven to dry out completely.

To make the custard cream, place the milk and vanilla extract in a medium saucepan and gently heat through. Combine the sugar, flour, eggs and yolk in the bowl of a freestanding electric mixer, and beat well until light and fluffy. Reduce the speed and add the warm milk in a steady stream. Once the milk has been added, return the mixture to the pan and whisk over medium heat until the sauce thickens. Remove from the heat and immediately whisk in the butter and white chocolate. Cool.

To make the toffee, combine the sugar and water in a small pan and bring to the boil. Add the glucose and lower the heat. Cook until the mixture is a warm caramel colour.

When ready to assemble, pipe a little custard cream through the base slit of each choux ball. Carefully dip each ball into the hot toffee and allow to set on a silicone sheet. Garnish while still sticky with a small fondant flower or butterfly.

20131026_131836


Pandowdy an American Classic

DSC03983

“Life is uncertain, eat dessert first” – Ernestine Ulmer

Now you might be reading this and thinking “what on earth is a Pandowdy”? Ive taken the time to look it up in the dictionary and even googled it….nothing. Im not sure where the origins of the name came from but at this moment all Im interested in is telling you all about the pastry.

Im never sure about a pastry until I have tried and tested it more than a few time with friends and family. This is probably one of my most favourite pastry’s its rustic it light and crumbly, its full of charm and a dream to work with …..all the characteristics you look for in a pastry. If you have oven proof bakeware the beauty of this dessert is that it can go from the oven to the table.

DSC03981DSC03974

Ingredients:

150g Self-Raising Flour

2 Tablespoons Icing sugar

1 Tablespoon Custard Powder

100g Butter – Unsalted

1 Egg

65g Sour Cream


Egg-Wash:

1 Egg yolk

1/2 Tablespoon Milk

You will Need:

6-8 Ovenproof Ramekins –  One serve per person

Poached fruit – your favourite caned fruit it perfect for this just drain excess liquid – Peach, Apple, Pear (are my favourites)

Rolling Pin

Method:

Pre-heat oven 180 Degrees

1: In a food processor add Self-Raising Flour, Icing sugar, Custard Powder and Butter process until the mixture resembles breadcrumbs. If you don’t have a food processor rub the ingredients together using your fingertips.

2: Add the egg and sourcream, bring the mixture together to form a dough ball. Do not over work the pastry.

3: On a floured surface use a rolling pin to roll out the pastry cut enough pastry to completely cover the top and slightly hang over the sides of the ramekins to form a nice lid. Brush the pastry with the lightly beaten egg wash and bake till golden 20 – 25 minutes.

To serve:

Now its entirely up to you, ice-cream or a lovely big dollop of freshly whipped cream always works for me but I have to tell you its great just on its own. Now that said it all for this pastry.

DSC01205


Inspired by recipe from “The Australian Good Taste Magazine”, 2012.


Aromatic Wine Poached Pear and Almond Tart

20140419_153152

Poaching pears in a blend of good red wine, and boosting the warmth of the poaching liquid by adding spice aromatics like a cinnamon stick, star anise, lemon and orange peal and you have a pear that will tantalise your every taste bud with every spoonful.  

Wine Poached Pears

150g Marsalla Wine

750g Red Wine

150g Caster Sugar

1 Cinnamon Stick

Lemon and Orange Peal

1 Star Anise

10-12 Small Corella Pears (pealed and seeds hulled)

Now don’t over complicate this its as easy as.

1: You will need a pot (with a lid) that will fit all your pears side by side in an upright position.

2: Add all poaching ingredients to the pot – the wine, sugar, spices and peal. On low heat stir till sugar has dissolved.

3: Peal pears and remove the core if possible leave the stems for now (you can remove after they have been poached and cooled)

4: Place the pears in the pot, lid on and allow them to poach for about 20 – 30 minutes. Test the pears to see if they are ready by piercing with a small knife if  the tip of the knife slides in easily then they are ready, under poached pears do not have a very pleasant texture.

Just a note: At this stage you can ditch the rest of the recipe, pop the cooled poached pears with the liquid  in the fridge. They make an amazing dessert on their own with a dollop of double cream, or your favourite vanilla ice-cream and for crunch place the pear on some recently baked puff pastry sprinkled with some cinnamon sugar and you have lovely individual desserts. Don’t forget to drizzle some of the poaching liquid over the top!

20140419_153127

Sweet Pastry Crust

125g Butter (cubed)

125g Icing Sugar

1 Free Range Egg

250g Organic Plain Flour

25g Almond meal

The hard work has been done its time to let the food processor take over.

1: Place the flour, butter, almond meal and icing sugar in the bowl of the food processor. Pulse 4 – 6 times till all resembles an even crumble.

2: Add the egg yolk and 1 tablespoon of cold water, pulse the flour mix again till it starts to come together. Remove the pastry dough push it all together, flatten out into a disc shape wrap in food grade plastic wrap and rest in the fridge for 10 – 15minutes.

3: Time to make the Almond creme, once again another a handheld mixer standard mixer is perfect for this job.

IMG_20140420_020519

Almond Creme

125g Butter (room temperature)

125g icing Sugar

125g Almond Meal

2 Free Range Eggs (room temperature)

1 teaspoon Queens Vanilla Bean paste

1: Cream together the butter, icing sugar and vanilla bean paste, be a little patient and don’t rush. Once the butter and sugar are pale light and fluffy in appearance add the eggs one at a time.

2: Add the almond meal, stop beating when all ingredients have combined. Set aside for the moment.

3: Pre-Heat the oven 180 Deegrees.

Tart shell filled with almond creme
Baked to a golden finish

20140419_145311

Arranging the poached pears

Assembly

1: On a lightly floured surface, roll-out the pastry about 4-5 millimetres thickness. Line the base and sides of a 26cm round nonstick fluted tart baking pan and trim the edges.

2: Fill the tart shell with the Almond Creme filling no more than 3/4 full.

3: Bake the tart on the middle shelf for approximately 25 minutes or till light golden colour. Once baked remove form the oven and allow to cool completely before removing from the baking pan.

4: Decorate the cooled tart with the poached pears.

Just a note: Baking is part science and a whole lot of creativity! So you can either cut the pears in half, or slice them into wedges and arrange them around the tart. If they are small pears they look great left whole as an individual serving. Its up to you.

Happy Baking by Baking Beautiful

Maria – The Great Australian Bake Off

Band of Bakers Australia

Instergram: BakingBeautiful


Grab a spoon, this is going to get messy!

When I think of French baking the main ingredients come to mind flour, butter, Eggs, Sugar and Spice. Each one is carefully chosen to achieve a result of texture and flavour, it is these same carefully chosen ingredients that are used to achieve perfection and excellence in quality.

French patisserie is taken very seriously and for a chosen few it is a way of life. A modern revolution has taken place amongst pastry chefs which have chosen to push the boundaries of french classics producing elaborate masterpieces which are encased by an explosion of colours and flavours. The treasured bakeries are more like emporiums pushing the limits of reinvention, giving a twist to grandmothers treasured favourite. Breathtaking make-overs creating show stoppers filled with the imagination of an artist.

IMG_20140221_205917

The showcase at Le Petit Gateau is filled with what one would only describe as a visual arts show. There are certain foods that create their own special aura, a world of wonder and a dilemma for the taste buds.

Though we describe them as works of art and the initial reaction or comment made is  “It’s too beautiful to eat”, a thought that Executive Pastry Chef Pierrick Boyer said “I wish they would just eat it, and enjoy the moment”. There is a kind of momentary sadness which dissipates very quickly as your fork is plunged into your chosen dessert. With a wave of delight the “Oh its too pretty” comments are very soon forgotten. Your mouth fills with the carefully matched flavours, and layer after layer the only thought you have is that this is an experience you only wish it wouldn’t come to an end.

20140221_153043

I took the opportunity to spend a day at Le Petit Gateau and the team, its always a challenge to see if given the opportunity would I enjoy this type of environment. Perhaps I had been watching too many shows where the fiery tongue of a chef was prevalent and the mishaps of contestants were highlighted with an over regimented barking of orders would echo through the kitchen. Ok so a little nervous thought did travel through my mind. I must stop watching those shows!

I was greeted at the door 7.30am on the dot with huge smiles and a warm friendly welcome. With a shot of coffee under my belt and the guidance of Kim the day began. Armed with a list for the day I was more than happy to take my orders. Im happy to say that looking back the day consisted of spreading sponges, quenelles and dressing plates with consistent perfection, preparing Bomb Alaska, making meringue and vanilla bean garnish, Raspberry Souffle, biscuits and so much more! The team was amazing like a well oiled machine tasks were completed under the guiding eyes of Executive Chef Pierrick always there to advise and encourage. Before I could blink my day had come to an end. Exhilarated at the thought that I hadn’t buckled it was finally time to sit down and have a chat with Pierrick.

Q:  Where or with who did you training to become a Pastry Chef?
A:  I did my training in France & Belgium, where I worked for a year, in Strasbourg, Brussel, Reims & Bordeaux, before I worked in Italy for 6 months.

Q:  Do you have the same passion for cooking as you do for baking?
A:  Yes, as a guest & eating in restaurant, to cook the savoury dishes, not really, I don’t do it

Q: If you had to choose one dessert as your favourite what would it be?
A: Hard one, I’d say half a tiramisu & other half in creme brule! It would be one dessert right! lol

Q: Is Le Petit Gateau everything you have wanted to achieve or is there more to come?
A: It’s a good achievement & I would be happy with it in my younger years, now, I’d like to open something bigger, cater for organic breakfast & lunch and why not open over seas, how good would it be! While based in Melbourne, very important, It’s too Amazing living here 😀

I have few food hero’s to like Jean Delaveyne, Michel Roux, Raymond Blank, Emmanuel Mollis, Alain Fabregues and yes Pierrick Boyer. They are the masters and even though French cuisine is recognised for its flavours, textures, and colours it is the composition of a dish and the presentation which will always takes centre stage the ability to modernise classic with artful intent. Le Petit Gateau has the “WOW” factor and sure to impress.

I wish to thank the team a Le Petit Gateau and Pierrick Boyer for the kindness and warmth that they extended to me, and I look forward to seeing them all again very soon.

Le Petit Gateau, 458 Little Collins Street, Melbourne 3000 ph:  03 9944 8890

www.lepetitgateau.com.au

www.pierrickboyer.com

Facebook: www.facebook.com/ChefPierrickBoyer

Instagram & Twitter: @pierrickboyer

Merci

Maria

20140221_193254

Christmas Baking Classes

I have always said that nothing say’s “I love you” or “I Care” or just “Thank you”
like a gift from home.

image002

This Christmas Baking Class will sure put a smile on everyones face with the gorgeous desserts you will learn to:

Make, Bake, Decorate and at the end of class

Take Home a wonderful sample selection of everything you have made.

BOOK NOW!

A: “Best of Bake Off”

Next Class: December, Sunday, 15th from 9.00am till 3.30pm

Only 8 places available per class.

At: LG Kitchen, Shop 90, Cecil Street, South Melbourne Market

$160 per person

A Best of Bake Off 15:12

A: In this class you will learn to make:

· Gluten Free Spiced Raspberry Tart

· Baked Honey Blossom Cheese Cake

· Choc-Orange Mini Tarts

·Mango and Raspberry Tarts

20131130_162200

BOOK NOW!

B: Christmas Desserts

Next Class: December, Sunday, 22nd from 9.00am till 3.30pm

Only 8 places available per class.

At: LG Kitchen, Shop 90, Cecil Street, South Melbourne Market

$180 per person

B Christmas Desserts Class 22:12

 B: In this class you will learn to make:

· Baked Honey Blossom Cheese Cake

· Tropical Meringue and White Chocolate Trifle *(Bowl will be provided)

· Red Velvet Swiss Roll with White Chocolate and Mascarpone cream

·Fancy Gingerbread Cookies

In this class you will learn:

· Techniques and recipes for home use

· Create your own unique decorations

· Rolling, cutting, baking dough

· Intricate assembly techniques

This slideshow requires JavaScript.

Please email your preference for:

Class  A on Sunday 15th of December 9.00am – 3.30pm

Class B  on Sunday 22nd of December 9.00am – 3.30pm

*Please note that appropriate clothing must be worn at all times, including closed-toe footwear, preferably no loose garments or extra jewellery.

*Please do not make travel arrangements until your class has been confirmed. We do not offer refunds for classes once your payment has been processed.

*Please note participants must be 18 years of age or over.

*Note: GIFT VOUCHER ARE AVAILABLE AND WILL BE SENT VIA EMAIL – MINIMUM $10.00
Vouchers are valid for a period of 365 day(s) from date of purchase.

Episode 2: The Great Australian Bake Off – “Pie” How to avoid a soggy bottom!

Aromatic Braised Beef Pie with Swiss Brown Mushrooms & Broad beans

S_BraisedBeef

For the recipe to my Aromatic Braised Beef Pie and other contestants pies please follow the link bellow.

Maria’s Aromatic Braised Beef Pieninem.snPie Recipe

Image

71857_212338778919863_1764402329_n

Pie Week!

When I think winter baking, I think PIE!

Apple pie, Chicken pie and Beef pie these are the three pies that are bake almost traditionally in our house hold and every year there is always a little twist on the filling something new or just the delicious original recipes!

Its important to note that the publishers decided to change my pie recipe slightly but either way you make it will still be delicious. Choosing to make only the pie top still has many of the same principals and I will list a few helpful hints to avoid the dreaded soggy pastry!

Image

 These are my top hints to remember when preparing pastry: For a Home baked Pie! 

1: Once you have made your pastry wrap it in plastic wrap and allow it to rest in the fridge for 10 – 15 minutes. Remember this type of pastry just needs to be gently pressed together NO KNEADING you don’t want to encourage the gluten to form any quicker or risk melting the butter with warm hands and overworking the dough.

2: After you have rolled out your pastry and covered the base and sides of the pie tin have a close look at the pastry if you think it looks a little thin in areas then use the excess bits of pastry to patch these areas and make them thicker.

3:Brush the pastry with egg white then place the pastry back into to fridge to cool and rest for a further 10 minutes. Doing this will further stop the pastry from becoming soggy.

4: Always completely cool your pre-cooked pie filling before adding it to your pie case. If the filling is even slightly warm it will melt the butter in the pastry and soak through hence the dreaded SOGGY BOTTOM!

5: Always Pre-heat your oven before baking. The oven will need up to 10 – 20 minutes to reach the temperature required to begin baking. An internal hanging oven thermometer is great if you are unsure.

I have always maintained that baking if FUN and the results of your labour are truly worth the effort but baking is not quick!                    It is essential to follow these simple rules as even the simplest recipe has crucial steps.

Image

Image

Image

Image

Image

The Showstopper Challenge – Party Pies, Pasties and Sausage Rolls

Party Pies and Pasties

These are my assorted savoury party treats.

The Little French Deli

Image

….un peu de France dans votre assiette…..  a little bit of France on your plate

I have always felt that home is where the heart is no matter how near or far you may find yourself. In a world of travellers and backpackers, establishing yourself in a country far from home can be daunting but as many migrants have found that only when surrounding yourself with familiarity a state of satisfaction and happiness can be established.

Image 6

“Bonjour”….With this basic and all to often taken for granted greeting, a connection has been made. My instinct to respond was put in action of which I replied proudly with “G-day” and a little giggle and whisper of Bonjour!  A very AUSSIE -FRENCH welcome!

At a glance, I came eye to eye with all the classics Duck Confit and Cassoulet, a fine display of wine, cheese and croissants, tarts and pies! The menu board listed a degustation of all the flavours that represented food from home a Parisian Home. The store board out the front of “The Little French Deli” simply listed Bread, Cheese, Charcuterie, Patisseries and All French!

Yes, for those who have made the journey to Bonbeach and visited the little deli, what it may lack in shop front space it makes up for with heart and passion and did I mention the glorious sunlit court yard. The court yard is perfect spot to soak up some winter sun and fresh air. You may even be greeted by the neighbourhood cat which has also adopted a French sophistication.

We surround ourselves with family, friends and food all these fill the void but allow as to embrace the present new family, friends and new opportunities. The little French Deli was established in October of 2012 by two fine french men with a passion to delight us with beautiful buttery pastry, golden bread sticks, tantalising tarts and for one food blogger a sensory overload. Romain, the French engineer from Lyon and Gaspard, he grew up in the kitchen of his parents Fine Cuisine Restaurant. Embrace the flavours of France and make them feel as much welcomed as they make you feel and with much gusto as you enter the deli say……..”Bonjour”   (Thats G-day to you and me)

Image 2

The Little French Deli

http://www.thelittlefrenchdeli.com

524 Nepean Highway

Bonbeach, Victoria

thelittlefrenchdeli@gmail.com

Open Tuesday to Sunday from 10 am to 5 pm.

What a TART!

Chocolate Tart with a hint of gold leaf

There are a multitude of beautiful tarts being created everyday by equally amazing pastry chefs. I consider these real works of art. Sometimes to stunning to eat, well you pause take a deep breath admire the craftsmanship and the next thing you know you have just taken your first bite. Pure joy!

Image

The pastry is fine light and buttery, flaky with hints of chocolate, almond or hazelnut meal and a hint of sweetness as to compliment the finished product and not overpower it. Shortcrust pastry like the more delicate Pate brisee a delicate pastry perfect for savoury tarts. Then there is Pate sucree and Pate sablee both contain a higher amount of butter and sugar making this pastry even more delicate and giving you a wonderful melt in the mouth.

Image

The filling are equally divine, salted caramel delicious chocolate, nuts, fruit, curds and creme patissiere are only a drop in the ocean of the delights used to make perfect tarts in different shapes and forms. The smell is intoxicating and the individual elements are unique spellbinding so you can be forgiven for giving in to moments when you can’t hardly wait until they are cooked to enjoy one.

Chocolate Tart

Lemon Tart

Caramel Pecan Tart

If I have wet your creative baking appetite then look to buy a book like Pastry Savoury & Sweet by Michel Roux or Baking with Passion by Dan Lepard & Richard Whittington. Still not feeling completely confident take the bull by the horns and follow your passion enrol in a course at Savour Chocolate & Patisserie School here in Melbourne student enrol from all corners of the earth.  www.savourschool.com.au  The pastry chefs Robyn and Paul will hold your hands while you amaze yourself and might I add enjoy the fruits or rather the tarts of your labour!

Ever since I moved to Melbourne I haven’t been able to find a good old fashion Custard Tart with a light sprinkling of nutmeg.

Recipe coming soon!